Maybe you’re wondering why a CB Microphone won’t sound nice after connecting all the wires on your radio. Are you sure the wires are in place?
There are radio brands which use up general wiring but it’s not always the case. For example, Cobra radio has 4 pins with a wiring code Shield, Audio, Transmit and Receive while 4 pins wired Midland radio has Audio, Shield, Receive, and Transmit. Microphones’ wiring color code is not the same as you can see the CB microphone wiring color code is interchanging.
Yes, microphone wiring is so stressful when the right wiring info is out of reach. Below is information you wouldn’t miss about microphone wiring so keep on reading.
Microphone Wiring Color Codes
Most of the mic’s wiring has a different color designation. And there are times when it’s hard to figure out each wire’s function and a color code. It might be a trial-and-error process to know the proper arrangement of wires. But, thanks to Ohm Meter! The work could be done quickly and more convenient.
You may also like: Radio Codes
Here are the colors codes for Astatic 6-Wire Microphones:
- White – For audio
- Blue – For switching via common lead
- Red – For push-to-talk button via transmit lead
- Black–For receive control
- Yellow–For receive ground(optional)
- Shield –For ground
For more details about wiring color codes, check out the Astatic Wiring Handbook and see different microphone wirings. The proper wiring arrangement with the wire code is specifically discussed down below.
CB Mic Wiring Diagram
The diagram below shows the proper wiring connection of 4-wired mic cable. A certain wire has an appropriate pin number that is necessary to be followed. Not following the details will cause your household harm.
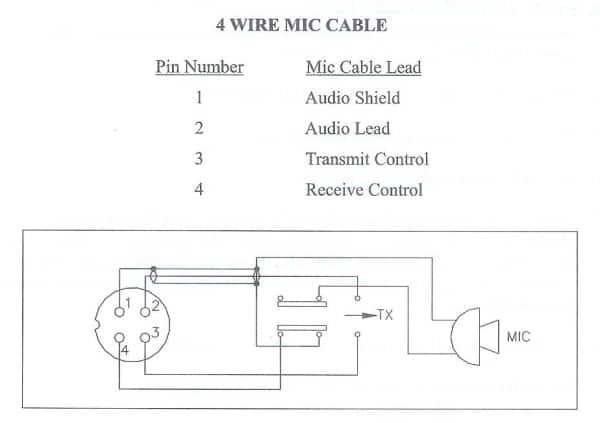
Source: MyRadioLab.com
Now, we’ll talk about a 5-wired microphone as shown in the diagram below. Here are the included five wires discuss briefly:
- Audio lead: It is wrapped by the shield wire, which is actually the second wire.
- Transmit lead: Use the Ohm Meter then check the three other wires. Check the two wires at the same time until you get continuity. The remaining wire that isn’t tested is the transmit lead.
- Common lead: Press the push-to-talk button and check for continuity. Check the two unidentified wires together with the transmit lead and whichever reads continuity with TX wire is considered as a common lead.
- Receive lead: The remaining wire is obviously the receive lead.
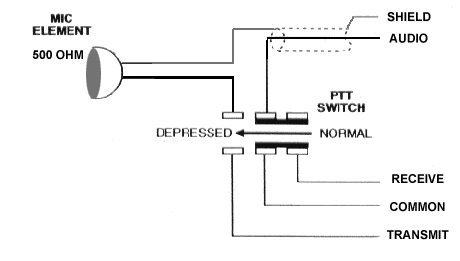
Source: cbradio.co.uk
Troubleshooting
There’s a huge possibility of a radio and microphone cable not perfectly matching. Like the number of wires is more than microphone pins or vice versa. Here are ways to make it fit even if not perfectly suitable:
- In case there are 6 wires available and not all are used on the mic connector, cut it short enough to prevent any connection on any of the pins.
- If there are 4 wires, shield wire will turn as a common wire.
- What if there are only 4 pins and there are 5 wires? Join together the common and shield wire on one pin.
Indeed, there’s always a way!
3 Steps on Wiring a New Mic to CB
Did you buy a new mic and wondering how it’ll be wired to your CB? That’s another challenge to take off. Here are three easy to follow steps on wiring a new mic to CB:
- Determine which function on the CB the mic socket’s pin performs. It is TX, RX, Audio, or Ground.
- Know which wire color might perform on the new mic.
- Fix the wires on its corresponding pins on the new plug.
Few Reminders with your Microphone
- Keep the connections tighten.
- The connection of microphone pins and microphone plug must be safeguarded. A small flathead screwdriver might help to gently spread the pins.
- Securely plugin the CB mic. Check out if there are breaks or damages on both plug and cord and also the pins in the radio.
- Press on the CB microphone button along the process.
- Put a battery in it whether a power mic or an echo mic.
- For more reminders, visit Troubleshooting Radios Article.
Wrapping Up
Knowing the CB microphone wiring color code is a great way to learn how to personally setup radio and microphone devices. It may seem crucial as you can see on CB mic wiring diagram but it’s actually not. You can search for more detailed tutorials on YouTube about microphone wiring and then follow every step.
Then again, there are six total wiring color codes with corresponding wires such as audio, transmit, receive, common, shield, and ground. Two diagrams are shown, one for 4-wire mic and the other for a 5-wire mic. Only a few differences are seen between the two in terms of wire connections. Troubleshooting is the key to keep things done. In case you buy a new mic, only three steps are to be followed to finally set up the new mic. Keep your eyes on the few reminders provided above for your own sake.